
MCP in Practice: How to Create Your Own Server Locally
"Hello, World": See Your First MCP Server in Action!


In the first part of this article, we explored what the Model Context Protocol (MCP) is - the open standard proposed by Anthropic that enables language models like Claude to interact with real-world data and tools in a secure, efficient, and modular way.
If MCP were a physical connector, it would be the USB-C of AI integrations: plug a tool on one end and an AI on the other, and they can communicate without the need for complex infrastructure or custom-built solutions.
Now that we understand the potential of this protocol, it’s time to get hands-on.
In this post, we’ll walk through a basic example — the classic “Hello, World” — to see how an MCP server works in practice. We’ll also share some helpful resources and repositories with ready-to-use examples for those who want to start experimenting with this new ecosystem.
If you’re curious to see MCP in action, keep reading!
MCP Architecture
Just to recap, the MCP structure follows a client-server model, where an application (host) can connect to multiple servers:
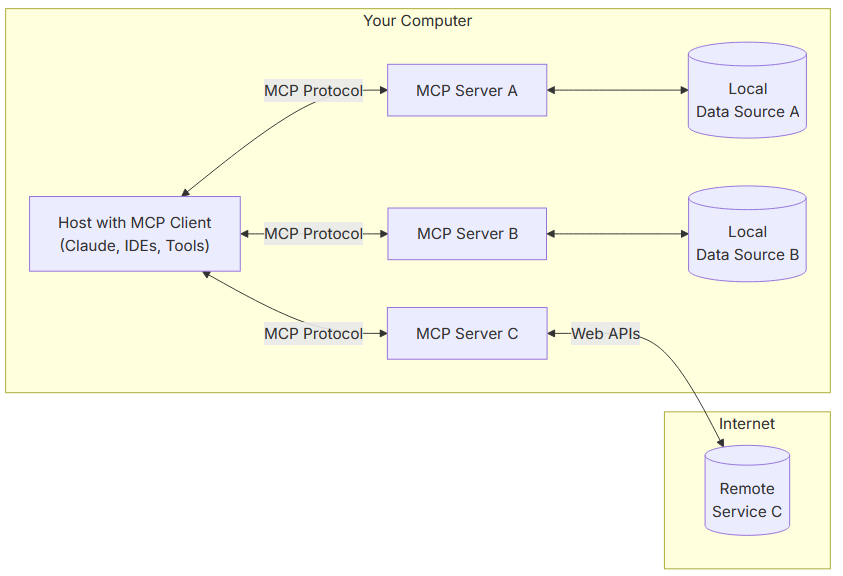
Applications such as assistants, IDEs, and chatbots act as hosts, using an MCP Client to communicate with MCP Servers. These servers are lightweight programs that expose local or remote data and functionalities via the MCP protocol, ensuring security and privacy.
The accessible resources include data (like files and databases) and tools (such as query execution or API access).
Operational flow: the user sends a command → the MCP Client sends it to the MCP Server → the server accesses the resource → returns the response → the host displays it to the user.
Creating Our MCP Server
To get started, let’s install the official MCP library for Python. It allows us to create both MCP-compatible servers and clients.
I'm using WSL (Windows Subsystem for Linux), but you can also run the commands directly on Windows using the terminal (Command Prompt or PowerShell).
Simply run the following command:
pip install mcpNow, navigate to your workspace folder, or create one if it doesn’t exist, and then create a folder named “mcp-hello-world” (as an example). Next, enter the folder.
Create a file named server.py with the following code:
# server.py
from mcp.server.fastmcp import FastMCP

# creating our MCP server
mcp = FastMCP()

# adding our tool
@mcp.tool(name='hello-world', description="First MCP")
def hello_world():
    return "Hello World!"

if __name__ == "__main__":
    mcp.run(transport='sse')
The FastMCP server is our main interface for the MCP protocol. It handles connection management, protocol compliance, and message routing.
Tools allow LLMs to perform actions through your server. Unlike resources, which only provide data, tools perform active computations and can access external APIs, web services, or execute any computational logic we define.
Now, let’s run our server:
python server.pyThe server will be running locally on port 8000, ready to receive requests.

Now let’s create our client, to test communication with the server.
In this example, we won’t integrate with an LLM, as the goal is educational — we want to see the MCP protocol working in practice.
Create a file named client.py in the same folder, with the following code:
from mcp import ClientSession
from mcp.client.sse import sse_client

async def run():
    # connecting to our server
    async with sse_client(url="http://localhost:8000/sse") as streams:
        async with ClientSession(*streams) as session:
            # initializing the session
            await session.initialize()

            # calling the "hello-world" tool
            result = await session.call_tool("hello-world", arguments={})

            # output
            print(result.content[0].text)

if __name__ == "__main__":
    import asyncio
    asyncio.run(run())
The client will connect to our server and call the "hello-world" tool, displaying the message "Hello World!" in the console.
Let’s run the file client.py:
python client.pyOutput:
Hello World!Now, let’s create a new tool that adds two numbers. In the server.py file, add the following:
@mcp.tool(name='add-numbers', description="Adds two numbers")
def add(a: int, b: int) -> int:
    """Add numbers"""
    return a + b
And in the client, let’s add a call to this tool as well:
data = {"a": 10, "b": 22}
result = await session.call_tool("add-numbers", arguments=data)
Now, when running the client, we get the following output:
>> python3 client.py

32
And that’s it - simple as that!
The code is based on the project https://github.com/Filipi1/mcp-hello-world/. If you prefer, you can clone the repo with git clone and don’t forget to leave a star on the repository. 😉
MCP Servers
Now, let’s take a look at a list of several ready-to-use MCP servers.
https://mcp.so/explore: The largest collection of MCP servers and clients, featuring awesome projects and integration with Claude via MCP.
https://github.com/punkpeye/awesome-mcp-servers: A curated list of amazing servers that use MCP.
https://github.com/modelcontextprotocol/servers: A collection of reference implementations for MCP, including community-created servers and additional resources.
https://github.com/ALucek/quick-mcp-example/: A very cool RAG example using MCP, complete with tools, resources, and prompts.
Hope you enjoyed it!
See you in the next post!! ❤️
This is a great piece. Thank you for this💯.